Introduction

For every gamer, water damage is a nightmare. A small splash or spill can make your favorite console useless. Instead of running to buy another new one, here’s a step-by-step guide on salvaging the device.
To fix the game console water damage issue, you should power down immediately, remove the battery and accessories, wipe down the console, open the console, dry the console thoroughly, and you can use a dehumidifier. Next, inspect for corrosion, reassemble the console, power it on and test it, and seek professional repair if the issue isn’t resolved.

A Step-by-Step Console Repair Guide to Fix Water Damage

Water damage affects the functionality of some much-loved consoles. This step-by-step console repair guide will provide practical solutions to keep your gaming experience running.

Step 1: Power Down Immediately

First and foremost, turn off your gaming console if it hasn’t shut off yet. Water doesn’t get along with electricity. If left on, the console may short out, damaging some internal parts even more. Unplug cables and detach accessories like a controller, memory cards, and discs. Do not try to turn it back on until you’re bone dry.

Step 2: Remove the Battery and Accessories

Before you try to repair water damage on your gaming console, removing the battery and all the accessories attached to it is essential. Pulling out controllers, storage devices, and other peripherals minimizes further risk of damage. This console repair step allows for better access to the internal components of your console during drying and cleaning.

Step 3: Wipe Down the Console

Once you have powered off and unplugged the device, you clean any dripping liquid with a microfiber cloth or soft t-shirt from the outside. Avoid rubbing the water too far in through the holes. Don’t shake it violently because this will only move it around inside.

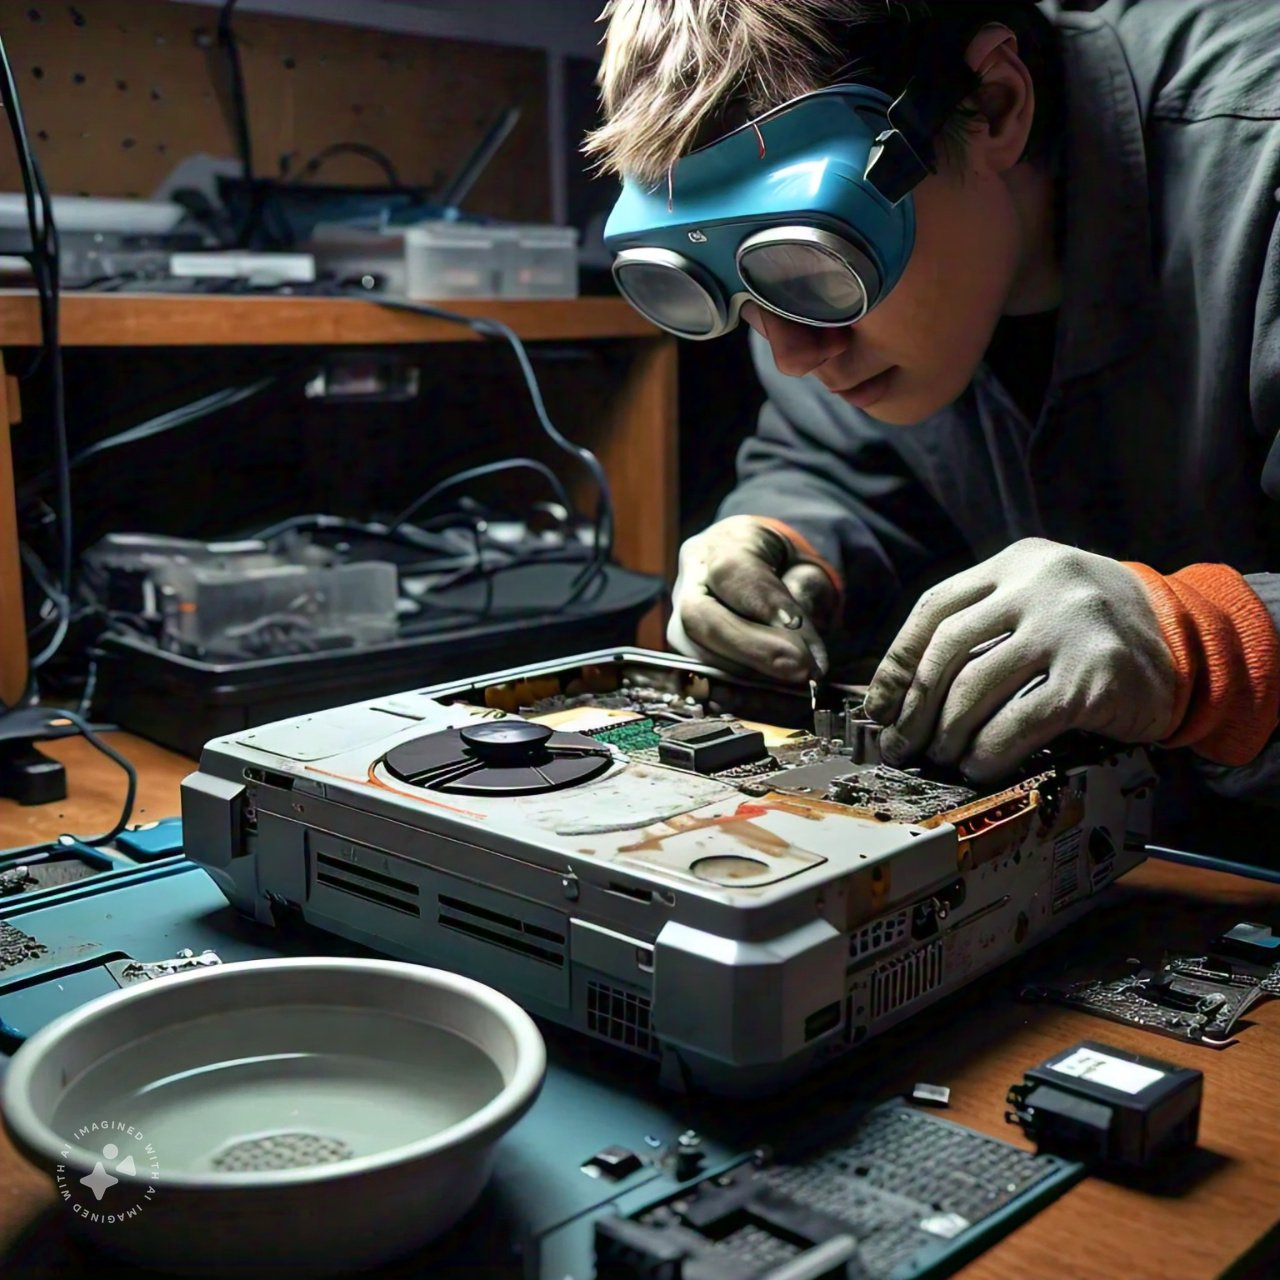
Step 4: Open the Console

This requires technical confidence, but opening the console can help dry it further. Opening the casing will provide access to wet internal components, which you can examine if you like. You also have the option of hiring certified console repair technicians to do the job for you.

Step 5: Dry the Console Thoroughly

Here comes the real work: drying. You should not use a hair dryer, as it would warp plastic parts or blow water into deeper areas. Just let it sit in a dry, well-ventilated area for at least 24-48 hours

Silica Gel Packets

If you have silica gel packets in a shoebox or electronics packaging, you can scatter them around and inside the console. Silica gel packets are wonderful at soaking up moisture.

Rice Method as a Part of Expert Console Repair Solutions:

Put the console in a dry, raw rice bucket. Rice is a desiccant that dries out moisture, helping to remove moisture from the air. Although this method may be questioned regarding its effectiveness, it is useful if silica gel packets are unavailable. The rice should not penetrate the inner compartments.

Step 6: You can Use a Dehumidifier

Another protection method for your gaming console that can handle water damage is using a dehumidifier in your house. It creates a drier atmosphere for spaces by reducing excess moisture in the air around it. This is also an effective console repair tip.

Step 7: Inspect for Corrosion

Put the internal parts out to dry. Water, in particular, if not distilled, can leach minerals into the components or rust them, which may harm your components. Corrosion typically arises as small white or greenish spots on the motherboard or other metal parts.
⦁ Clean corrosion with a small amount of 90% (or higher) isopropyl alcohol applied to a cotton swab or soft-bristled brush.
⦁ Rub the affected areas gently to remove the buildup.
⦁ Isopropyl alcohol evaporates quickly, so it does not cause moisture in electronics.

Step 8: Reassemble the Console

Assemble the device carefully once you have successfully repaired your game console. Be sure all the screws and components are in their right locations before closing the casing. If you had to crack open the console at some point, now is your chance to reverse everything and attach everything carefully again.

Step 9: Power On and Test

Now’s the moment of truth—testing your console. Plug the console back this time without any peripherals attached to the outside, and press the power button. If your console turns on and works fine, congratulations! You’ve saved your water-damaged gaming console.

Step 10: Seek Professional Console Repair Service (If Needed)

If you have completed all the troubleshooting steps, your game is still not working or showing basic issues. It should be repaired. Trained technicians have the specialized knowledge and tools to diagnose and repair complex water damage. This will ensure your console is restored to its original condition and quality.

What should you do immediately after spillage?

Immediately after a spillage, power off the gaming console, unplug it from the wall, and detach all connected peripherals. Quickly remove any visible liquid using a soft cloth to minimize damage.

How to repair a game console after water damage?

To repair a game console after water damage, power it off, disassemble, dry the components completely, clean corrosion with isopropyl alcohol, and reassemble. Seek professional help if issues persist.

How can you prevent future water incidents?

To prevent future water incidents with your gaming console, keep beverages away from your gaming setup, use spill-proof containers, and consider protective covers or cabinets to safeguard against accidental spills.

Conclusion

Dealing with water damage on a gaming console can be stressful, but with the right approach, you can minimize and potentially fix the damage. To fix the game console water damage issue, turn it off immediately, remove the battery and any accessories connected, clean the console, open it, and dry it out completely as a part of an expert console repair solution. You could also use a dehumidifier. Then, there must be an evaluation of corrosion from the console users, reassembling the console, turning it on, testing it, and seeking professional repair if it is not resolved.

logo
Exploring the Traditional Ale House Menu: A Journey Through Classic Pub Fare
A Christmas Story House: The Story Behind the Iconic Holiday Home
Finding the Perfect 2-Bedroom Houses for Rent: A Comprehensive Guide
Introduction Water is a vital resource that plays a significant role in our daily lives. However, the quality of water can vary widely based on location, which can lead to various issues in homes, particularly concerning hard water. For many households, investing in a whole house water softener is a practical solution. This article explores the ins and outs of whole house water softeners, including their benefits, how they work, types, installation, maintenance, and more. Understanding Hard Water What is Hard Water? Hard water is water that contains a high concentration of dissolved minerals, primarily calcium and magnesium. These minerals are naturally occurring and typically enter the water supply through the soil and rock formations. While hard water is not harmful to health, it can cause various problems for homeowners. Effects of Hard Water Scaling: One of the most visible effects of hard water is the buildup of scale in pipes, fixtures, and appliances. This scaling can lead to reduced water flow, increased energy consumption, and even damage to appliances like water heaters and dishwashers. Soap Scum: Hard water reacts with soap, leading to soap scum formation. This can make cleaning more difficult and require more detergent for effective cleaning. Dry Skin and Hair: Hard water can lead to dry skin and hair, as the minerals can strip natural oils. This can exacerbate conditions like eczema and lead to dull, lifeless hair. Stained Fixtures: Hard water can cause staining on sinks, tubs, and laundry due to mineral deposits. These stains can be difficult to remove and can affect the aesthetics of your home. The Need for Water Softeners A whole house water softener addresses these issues by reducing the hardness of the water throughout your home. By doing so, it not only improves the quality of the water but also protects your plumbing and appliances from the adverse effects of hard water. What is a Whole House Water Softener? A whole house water softener is a system designed to treat all the water entering a home, ensuring that every tap delivers soft water. Unlike point-of-use systems, which treat water at specific fixtures, whole house systems are installed at the point where water enters the home. How Do Whole House Water Softeners Work? Whole house water softeners primarily use a process called ion exchange. Here’s how it works: Ion Exchange Process: The system contains resin beads that are charged with sodium ions. When hard water passes through the system, the calcium and magnesium ions in the water are attracted to the resin beads and exchanged for sodium ions. This effectively softens the water. Regeneration: Over time, the resin beads become saturated with calcium and magnesium ions and need to be regenerated. This process typically involves flushing the system with a brine solution (saltwater) to restore the sodium ions on the resin beads. This cycle ensures that the system continues to effectively soften water. Control Valve: Most whole house water softeners come equipped with a control valve that automates the regeneration process based on water usage patterns. This feature enhances efficiency and ensures optimal performance. Benefits of Whole House Water Softeners mproved Water Quality By reducing hardness, water softeners significantly improve water quality, resulting in better tasting and healthier water for drinking and cooking. Protection for Plumbing and Appliances Softened water reduces scaling and buildup in pipes and appliances, extending their lifespan and improving efficiency. This protection can save homeowners significant repair and replacement costs in the long run. Enhanced Cleaning Efficiency With soft water, soap and detergents work more effectively, leading to cleaner dishes, brighter laundry, and fewer cleaning products needed. Homeowners often notice a decrease in soap scum and residue on surfaces. Healthier Skin and Hair Softened water can lead to better skin and hair health, reducing dryness and irritation caused by hard water. Increased Home Value A whole house water softener can be seen as a valuable addition to a home, making it more appealing to potential buyers, especially in areas with hard water issues. Types of Whole House Water Softeners When considering a whole house water softener, it’s essential to understand the different types available. The most common types include: Salt-Based Water Softeners Salt-based systems are the most common type of water softener. They operate using the ion exchange process and require regular salt refills for regeneration. They are highly effective in softening water but do add sodium to the water. Salt-Free Water Softeners Salt-free systems do not soften water in the traditional sense but rather condition it to reduce scale buildup. These systems often use a template-assisted crystallization (TAC) process that transforms hardness minerals into harmless, crystalized forms. They do not require salt, making them an attractive option for those looking to reduce sodium intake. Dual-Tank Water Softeners Dual-tank systems feature two resin tanks, allowing for continuous soft water supply, even during the regeneration process. This is particularly beneficial for larger households with higher water demands. Magnetic and Electronic Water Softeners These systems use magnetic or electronic fields to alter the properties of hard water minerals, preventing scaling without the use of salt. However, their effectiveness is often debated, and they may not provide the same level of softening as traditional systems. Choosing the Right Whole House Water Softener When selecting a whole house water softener, consider the following factors: Water Hardness Level Testing your water hardness is essential in determining the right system for your needs. Most manufacturers provide guidelines for selecting a system based on hardness levels. Household Water Usage Consider the number of people in your household and your average water usage. Systems are often rated for a specific flow rate, so it’s crucial to choose one that can meet your demands. Type of System Evaluate the pros and cons of salt-based versus salt-free systems based on your preferences, health considerations, and budget. Maintenance Requirements Different systems have varying maintenance needs. Salt-based systems require regular salt refills, while salt-free systems may need occasional cleaning or filter replacements. Budget Whole house water softeners can vary significantly in price. It’s essential to consider both the initial investment and long-term operating costs when making your decision. Installation of Whole House Water Softeners DIY vs. Professional Installation While some homeowners may opt for a DIY installation, professional installation is generally recommended for whole house water softeners. A professional plumber can ensure that the system is correctly installed and calibrated for optimal performance. Installation Steps Choose a Location: The softener should be installed near the main water supply line, preferably in a basement or utility room. Ensure there is enough space for the unit and future maintenance. Shut Off Water Supply: Before installation, turn off the main water supply and drain any remaining water from the pipes. Connect the System: Follow the manufacturer’s instructions to connect the system to the water supply line. This typically involves cutting the pipe and using fittings to connect the softener. Install Drain Line: A drain line must be connected for the regeneration process. This line typically goes to a nearby floor drain or sewer line. Power Connection: If the system has electronic components, plug it into a nearby outlet. Testing: Once installed, turn the water supply back on and test the system to ensure it’s functioning correctly. Maintenance of Whole House Water Softeners Regular Maintenance Tasks Maintaining your whole house water softener is crucial for its longevity and performance. Regular tasks include: Salt Refills: For salt-based systems, regularly check the salt level in the brine tank and refill as needed. Cleaning the Brine Tank: Periodically clean the brine tank to prevent sludge buildup, which can hinder performance. Filter Replacement: If your system includes filters, replace them according to the manufacturer's recommendations. Inspect for Leaks: Regularly check for any leaks in the system, especially around connections and valves. Professional Maintenance Consider scheduling professional maintenance annually to ensure the system operates efficiently and address any potential issues before they become significant problems. Conclusion A whole house water softener is a valuable investment for homeowners dealing with hard water issues. By understanding how these systems work, the benefits they offer, and how to choose, install, and maintain them, homeowners can improve their water quality and protect their plumbing and appliances for years to come. Whether you opt for a traditional salt-based system or a salt-free alternative, ensuring your home has soft water will lead to a more comfortable and efficient living environment.
Whole House Water Softener: An Essential Guide
Waffle House Menu Prices: A Comprehensive Guide

Our Other Blogs

Exploring the Traditional Ale House Menu: A Journey Through Classic Pub Fare
A Christmas Story House: The Story Behind the Iconic Holiday Home
Finding the Perfect 2-Bedroom Houses for Rent: A Comprehensive Guide
Introduction Water is a vital resource that plays a significant role in our daily lives. However, the quality of water can vary widely based on location, which can lead to various issues in homes, particularly concerning hard water. For many households, investing in a whole house water softener is a practical solution. This article explores the ins and outs of whole house water softeners, including their benefits, how they work, types, installation, maintenance, and more. Understanding Hard Water What is Hard Water? Hard water is water that contains a high concentration of dissolved minerals, primarily calcium and magnesium. These minerals are naturally occurring and typically enter the water supply through the soil and rock formations. While hard water is not harmful to health, it can cause various problems for homeowners. Effects of Hard Water Scaling: One of the most visible effects of hard water is the buildup of scale in pipes, fixtures, and appliances. This scaling can lead to reduced water flow, increased energy consumption, and even damage to appliances like water heaters and dishwashers. Soap Scum: Hard water reacts with soap, leading to soap scum formation. This can make cleaning more difficult and require more detergent for effective cleaning. Dry Skin and Hair: Hard water can lead to dry skin and hair, as the minerals can strip natural oils. This can exacerbate conditions like eczema and lead to dull, lifeless hair. Stained Fixtures: Hard water can cause staining on sinks, tubs, and laundry due to mineral deposits. These stains can be difficult to remove and can affect the aesthetics of your home. The Need for Water Softeners A whole house water softener addresses these issues by reducing the hardness of the water throughout your home. By doing so, it not only improves the quality of the water but also protects your plumbing and appliances from the adverse effects of hard water. What is a Whole House Water Softener? A whole house water softener is a system designed to treat all the water entering a home, ensuring that every tap delivers soft water. Unlike point-of-use systems, which treat water at specific fixtures, whole house systems are installed at the point where water enters the home. How Do Whole House Water Softeners Work? Whole house water softeners primarily use a process called ion exchange. Here’s how it works: Ion Exchange Process: The system contains resin beads that are charged with sodium ions. When hard water passes through the system, the calcium and magnesium ions in the water are attracted to the resin beads and exchanged for sodium ions. This effectively softens the water. Regeneration: Over time, the resin beads become saturated with calcium and magnesium ions and need to be regenerated. This process typically involves flushing the system with a brine solution (saltwater) to restore the sodium ions on the resin beads. This cycle ensures that the system continues to effectively soften water. Control Valve: Most whole house water softeners come equipped with a control valve that automates the regeneration process based on water usage patterns. This feature enhances efficiency and ensures optimal performance. Benefits of Whole House Water Softeners mproved Water Quality By reducing hardness, water softeners significantly improve water quality, resulting in better tasting and healthier water for drinking and cooking. Protection for Plumbing and Appliances Softened water reduces scaling and buildup in pipes and appliances, extending their lifespan and improving efficiency. This protection can save homeowners significant repair and replacement costs in the long run. Enhanced Cleaning Efficiency With soft water, soap and detergents work more effectively, leading to cleaner dishes, brighter laundry, and fewer cleaning products needed. Homeowners often notice a decrease in soap scum and residue on surfaces. Healthier Skin and Hair Softened water can lead to better skin and hair health, reducing dryness and irritation caused by hard water. Increased Home Value A whole house water softener can be seen as a valuable addition to a home, making it more appealing to potential buyers, especially in areas with hard water issues. Types of Whole House Water Softeners When considering a whole house water softener, it’s essential to understand the different types available. The most common types include: Salt-Based Water Softeners Salt-based systems are the most common type of water softener. They operate using the ion exchange process and require regular salt refills for regeneration. They are highly effective in softening water but do add sodium to the water. Salt-Free Water Softeners Salt-free systems do not soften water in the traditional sense but rather condition it to reduce scale buildup. These systems often use a template-assisted crystallization (TAC) process that transforms hardness minerals into harmless, crystalized forms. They do not require salt, making them an attractive option for those looking to reduce sodium intake. Dual-Tank Water Softeners Dual-tank systems feature two resin tanks, allowing for continuous soft water supply, even during the regeneration process. This is particularly beneficial for larger households with higher water demands. Magnetic and Electronic Water Softeners These systems use magnetic or electronic fields to alter the properties of hard water minerals, preventing scaling without the use of salt. However, their effectiveness is often debated, and they may not provide the same level of softening as traditional systems. Choosing the Right Whole House Water Softener When selecting a whole house water softener, consider the following factors: Water Hardness Level Testing your water hardness is essential in determining the right system for your needs. Most manufacturers provide guidelines for selecting a system based on hardness levels. Household Water Usage Consider the number of people in your household and your average water usage. Systems are often rated for a specific flow rate, so it’s crucial to choose one that can meet your demands. Type of System Evaluate the pros and cons of salt-based versus salt-free systems based on your preferences, health considerations, and budget. Maintenance Requirements Different systems have varying maintenance needs. Salt-based systems require regular salt refills, while salt-free systems may need occasional cleaning or filter replacements. Budget Whole house water softeners can vary significantly in price. It’s essential to consider both the initial investment and long-term operating costs when making your decision. Installation of Whole House Water Softeners DIY vs. Professional Installation While some homeowners may opt for a DIY installation, professional installation is generally recommended for whole house water softeners. A professional plumber can ensure that the system is correctly installed and calibrated for optimal performance. Installation Steps Choose a Location: The softener should be installed near the main water supply line, preferably in a basement or utility room. Ensure there is enough space for the unit and future maintenance. Shut Off Water Supply: Before installation, turn off the main water supply and drain any remaining water from the pipes. Connect the System: Follow the manufacturer’s instructions to connect the system to the water supply line. This typically involves cutting the pipe and using fittings to connect the softener. Install Drain Line: A drain line must be connected for the regeneration process. This line typically goes to a nearby floor drain or sewer line. Power Connection: If the system has electronic components, plug it into a nearby outlet. Testing: Once installed, turn the water supply back on and test the system to ensure it’s functioning correctly. Maintenance of Whole House Water Softeners Regular Maintenance Tasks Maintaining your whole house water softener is crucial for its longevity and performance. Regular tasks include: Salt Refills: For salt-based systems, regularly check the salt level in the brine tank and refill as needed. Cleaning the Brine Tank: Periodically clean the brine tank to prevent sludge buildup, which can hinder performance. Filter Replacement: If your system includes filters, replace them according to the manufacturer's recommendations. Inspect for Leaks: Regularly check for any leaks in the system, especially around connections and valves. Professional Maintenance Consider scheduling professional maintenance annually to ensure the system operates efficiently and address any potential issues before they become significant problems. Conclusion A whole house water softener is a valuable investment for homeowners dealing with hard water issues. By understanding how these systems work, the benefits they offer, and how to choose, install, and maintain them, homeowners can improve their water quality and protect their plumbing and appliances for years to come. Whether you opt for a traditional salt-based system or a salt-free alternative, ensuring your home has soft water will lead to a more comfortable and efficient living environment.
Whole House Water Softener: An Essential Guide
Waffle House Menu Prices: A Comprehensive Guide
Low-Pressure Area News: Understanding Its Impact and Importance
License News: Key Developments and Trends
Scroll to Top